Dart 通过 async-await、isolate 以及一些异步类型概念(例如 Future 和 Stream)支持了并发代码编程。本篇文章会对 async-await、Future 和 Stream
进行简略的介绍,而侧重点放在 isolate 的讲解上。
在应用中,所有的 Dart 代码都在 isolate 中运行。每一个 Dart 的 isolate 都有独立的运行线程,它们无法与其他 isolate 共享可变对象。在需要进行通信的场景里,isolate 会使用消息机制。很多 Dart 应用都只使用一个 isolate,也就是 main isolate。你可以创建额外的 isolate 以便在多个处理器核心上执行并行代码。
尽管 Dart 的 isolate 模型设计是基于操作系统提供的进程和线程等更为底层的原语进行设计的, Dart 虚拟机对其的使用是一个具体的实现,在本篇文章中,我们不对其具体实现展开讨论。
异步的类型和语法
如果你已经对 Future、Stream 和 async-await 比较熟悉了,可以直接跳到 isolate 部分 进行阅读。
Future 和 Stream 类型
Dart 语言和库通过 Future 和 Stream 对象,来提供会在当前调用的未来返回某些值的功能。以 JavaScript 中的 Promise 为例,在 Dart 中一个最终会返回 int 类型值的 promise,应当声明为 Future<int>;一个会持续返回一系列 int 类型值的 promise,应当声明为 Stream<int>。
让我们用 dart:io 来举另外一个例子。File 的同步方法 readAsStringSync()
会以同步调用的方式读取文件,在读取完成或者抛出错误前保持阻塞。这个会返回 String 类型的对象,或者抛出异常。而与它等效的异步方法 readAsString(),会在调用时立刻返回
Future<String> 类型的对象。在未来的某一刻,Future<String> 会结束,并返回一个字符串或错误。
为什么异步的代码如此重要?
It matters whether a method is synchronous or asynchronous because most apps need to do more than one thing at a time.
大部分应用需要在同一时刻做很多件事。例如,应用可能会发起一个 HTTP 请求,同时在请求返回前对用户的操作做出不同的界面更新。异步的代码会有助于应用保持更高的可交互状态。
异步场景包括调用系统 API,例如非阻塞的 I/O 操作、HTTP 请求或与浏览器交互。还有一些场景是利用 Dart 的 isolate 进行计算,或等待一个计时器的触发。这些场景要么是在不同的线程运行,要么是被系统或 Dart 运行时处理,让 Dart 代码可以在计算时同步运行。
async-await 语法
async 和 await 关键字是用声明来定义异步函数和获取它们的结果的方式。
下面是一段同步代码调用文件 I/O 时阻塞的例子:
void main() {
  // Read some data.
  final fileData = _readFileSync();
  final jsonData = jsonDecode(fileData);

  // Use that data.
  print('Number of JSON keys: ${jsonData.length}');
}

String _readFileSync() {
  final file = File(filename);
  final contents = file.readAsStringSync();
  return contents.trim();
}
下面是类似的代码,但是变成了 异步调用:
void main() async {
  // Read some data.
  final fileData = await _readFileAsync();
  final jsonData = jsonDecode(fileData);

  // Use that data.
  print('Number of JSON keys: ${jsonData.length}');
}

Future<String> _readFileAsync() async {
  final file = File(filename);
  final contents = await file.readAsString();
  return contents.trim();
}
main() 函数在调用 _readFileAsync() 前使用了 await 关键字,让原生代码(文件 I/O)执行的同时,其他的 Dart 代码(例如事件处理器)能继续执行。使用 await 后,_readFileAsync() 调用返回的 Future<String> 类型也转换为了 String。从而在将结果 content 赋予变量时,隐式转换为 String 类型。
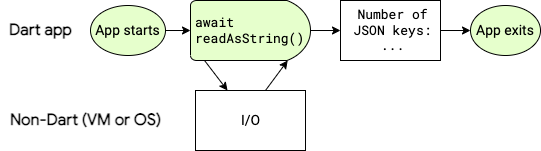
如下图所示,无论是在 Dart VM 还是在系统中,
Dart 代码都会在 readAsString() 执行非 Dart 代码时暂停。在 readAsString() 返回值后,Dart 代码将继续执行。
如果你想了解更多关于 async、await 和 Future 的内容,可以访问
异步编程 codelab 进行学习。
Isolate 的工作原理
现代的设备通常会使用多核 CPU。开发者为了让程序在设备上有更好的表现,有时会使用共享内容的线程来并发运行代码。然而,状态的共享可能会 产生竞态条件,从而造成错误,也可能会增加代码的复杂度。
Dart 代码并不在多个线程上运行,取而代之的是它们会在 isolate 内运行。每一个 isolate 会有自己的堆内存,从而确保 isolate 之间互相隔离,无法互相访问状态。由于这样的实现并不会共享内存,所以你也不需要担心 互斥锁和其他锁。
在使用 isolate 时,你的 Dart 代码可以在同一时刻进行多个独立的任务,并且使用可用的处理器核心。 Isolate 与线程和进程近似,但是每个 isolate 都拥有独立的内存,以及运行事件循环的独立线程。
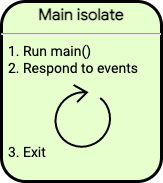
主 isolate
在一般场景下,你完全无需关心 isolate。通常一个 Dart 应用会在主 isolate 下执行所有代码,如下图所示:
就算是只有一个 isolate 的应用,只要通过使用 async-await 来处理异步操作,也完全可以流畅运行。一个拥有良好性能的应用,会在快速启动后尽快进入事件循环。这使得应用可以通过异步操作快速响应对应的事件。
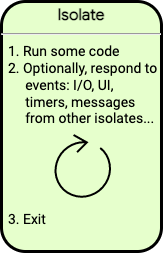
Isolate 的生命周期
如下图所示,每个 isolate 都是从运行 Dart 代码开始的,比如 main() 函数。执行的 Dart 代码可能会注册一些事件监听,例如处理用户操作或文件读写。当 isolate 执行的 Dart 代码结束后,如果它还需要处理已监听的事件,那么它依旧会继续被保持。处理完所有事件后,isolate 会退出。
事件处理
在客户端应用中,主 isolate 的事件队列内,可能会包含重绘的请求、点击的通知或者其他界面事件。例如,下图展示了包含四个事件的事件队列,队列会按照先进先出的模式处理事件。

如下图所示,在 main() 方法执行完毕后,事件队列中的处理才开始,此时处理的是第一个重绘的事件。而后主 isolate 会处理点击事件,接着再处理另一个重绘事件。
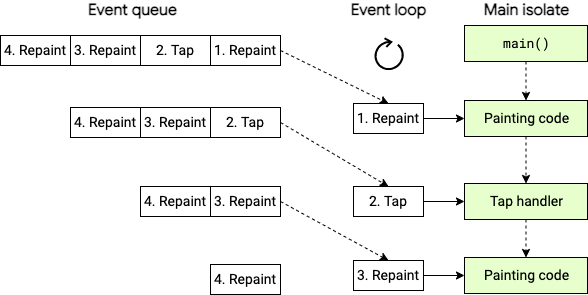
如果某个同步执行的操作花费了很长的处理时间,应用看起来就像是失去了响应。在下图中,处理点击事件的代码比较耗时,导致紧随其后的事件并没有及时处理。这时应用可能会产生卡顿,所有的动画都无法流畅播放。
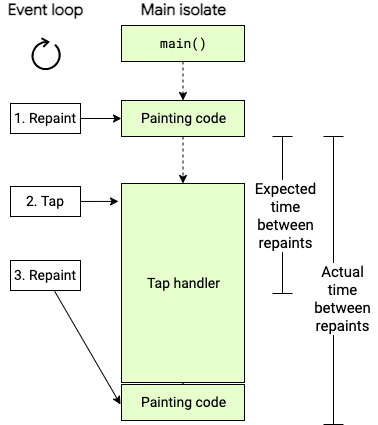
在一个客户端应用中,耗时过长的同步操作,通常会导致 卡顿的动画。而最糟糕的是,应用界面可能完全失去响应。
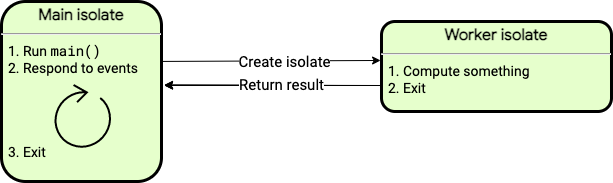
后台运行对象
如果你的应用受到耗时计算的影响而出现卡顿,例如 解析较大的 JSON 文件,你可以考虑将耗时计算转移到单独工作的 isolate,通常我们称这样的 isolate 为 后台运行对象。下图展示了一种常用场景,你可以生成一个 isolate,它将执行耗时计算的任务,并在结束后退出。这个 isolate 工作对象退出时会把结果返回。
每个 isolate 都可以通过消息通信传递一个对象,这个对象的所有内容都需要满足可传递的条件。并非所有的对象都满足传递条件,在无法满足条件时,消息发送会失败。举个例子,如果你想发送一个 List<Object>,你需要确保这个列表中所有元素都是可被传递的。假设这个列表中有一个 Socket,由于它无法被传递,所以你无法发送整个列表。
你可以查阅 send() 方法 的文档来确定哪些类型可以进行传递。
Isolate 工作对象可以进行 I/O 操作、设置定时器,以及其他各种行为。它会持有自己内存空间,与主 isolate 互相隔离。这个 isolate 在阻塞时也不会对其他 isolate 造成影响。
代码示例
本节将重点讨论使用 Isolate API 实现 isolate 的一些示例。
实现一个简单的 isolate 工作对象
These examples implement a main isolate
that spawns a simple worker isolate.
Isolate.run() simplifies the steps behind
setting up and managing worker isolates:
- Spawns (starts and creates) an isolate
- Runs a function on the spawned isolate
- Captures the result
- Returns the result to the main isolate
- Terminates the isolate once work is complete
- Checks, captures, and throws exceptions and errors back to the main isolate
Running an existing method in a new isolate
主 isolate 的代码如下:
void main() async {
  // Read some data.
  final jsonData = await Isolate.run(_readAndParseJson);

  // Use that data.
  print('Number of JSON keys: ${jsonData.length}');
}
The spawned isolate executes the function
passed as the first argument, _readAndParseJson:
Future<Map<String, dynamic>> _readAndParseJson() async {
  final fileData = await File(filename).readAsString();
  final jsonData = jsonDecode(fileData) as Map<String, dynamic>;
  return jsonData;
}-
Isolate.run()spawns an isolate, the background worker, whilemain()waits for the result. -
The spawned isolate executes the argument passed to
run(): the function_readAndParseJson(). -
Isolate.run()takes the result fromreturnand sends the value back to the main isolate, shutting down the worker isolate. -
The worker isolate transfers the memory holding the result to the main isolate. It does not copy the data. The worker isolate performs a verification pass to ensure the objects are allowed to be transferred.
_readAndParseJson() is an existing,
asynchronous function that could just as easily
run directly in the main isolate.
Using Isolate.run() to run it instead enables concurrency.
The worker isolate completely abstracts the computations
of _readAndParseJson(). It can complete without blocking the main isolate.
The result of Isolate.run() is always a Future,
because code in the main isolate continues to run.
Whether the computation the worker isolate executes
is synchronous or asynchronous doesn’t impact the
main isolate, because it’s running concurrently either way.
Sending closures with isolates
You can also create a simple worker isolate with run() using a
function literal, or closure, directly in the main isolate.
void main() async {
  // Read some data.
  final jsonData = await Isolate.run(() async {
    final fileData = await File(filename).readAsString();
    final jsonData = jsonDecode(fileData) as Map<String, dynamic>;
    return jsonData;
  });

  // Use that data.
  print('Number of JSON keys: ${jsonData.length}');
}
This example accomplishes the same as the previous. A new isolate spawns, computes something, and sends back the result.
However, now the isolate sends a closure.
Closures are less limited than typical named functions,
both in how they function and how they’re written into the code.
In this example, Isolate.run() executes what looks like local code, concurrently.
In that sense, you can imagine run() to work like a control flow operator
for “run in parallel”.
实现一个简单的 isolate 工作对象
Isolate.run() abstracts a handful of lower-level,
isolate-related API to simplify isolate management:
You can use these primitives directly for more granular
control over isolate functionality. For example, run() shuts
down its isolate after returning a single message.
What if you want to allow multiple messages to pass between isolates?
You can set up your own isolate much the same way run() is implemented,
just utilizing the send() method of SendPort in a slightly different way.
如果你想在 isolate 之间建立更多的通信,那么你需要使用
SendPort 的 send() 方法。下图展示了一种常见的场景,主 isolate 会发送请求消息至 isolate 工作对象,然后它们之间会继续进行多次通信,进行请求和回复。
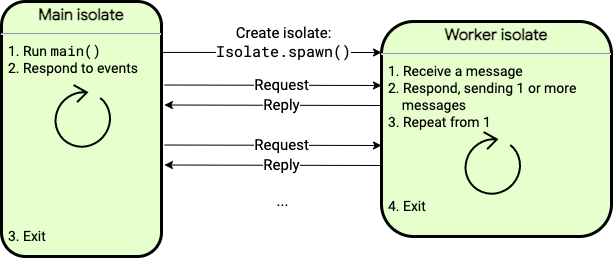
下方列举的 isolate 示例 包含了发送多次消息的使用方法:
-
send_and_receive.dart 展示了如何从主 isolate 发送消息至生成的 isolate,与前面的示例较为接近,不过没有使用
run()方法; -
long_running_isolate.dart 展示了如何生成一个长期运行、且多次发送和接收消息的 isolate。
性能和 isolate 组
当一个 isolate 调用了 Isolate.spawn(),两个 isolate 将拥有同样的执行代码,并归入同一个 isolate 组 中。
Isolate 组会带来性能优化,例如新的 isolate 会运行由 isolate 组持有的代码,即共享代码调用。同时,Isolate.exit() 仅在对应的 isolate 属于同一组时有效。
某些场景下,你可能需要使用 Isolate.spawnUri(),使用执行的 URI 生成新的 isolate,并且包含代码的副本。然而,spawnUri() 会比 spawn() 慢很多,并且新生成的 isolate 会位于新的 isolate 组。另外,当 isolate 在不同的组中,它们之间的消息传递会变得更慢。
Concurrency on the web
All Dart apps can use async-await, Future, and Stream
for non-blocking, interleaved computations.
The Dart web platform, however, does not support isolates.
Dart web apps can use web workers to
run scripts in background threads
similar to isolates.
Web workers’ functionality and capabilities
differ somewhat from isolates, though.
For instance, when web workers send data between threads, they copy the data back and forth. Data copying can be very slow, though, especially for large messages. Isolates do the same, but also provide APIs that can more efficiently transfer the memory that holds the message instead.
Creating web workers and isolates also differs.
You can only create web workers by declaring
a separate program entrypoint and compiling it separately.
Starting a web worker is similar to using Isolate.spawnUri to start an isolate.
You can also start an isolate with Isolate.spawn,
which requires fewer resources because it
reuses some of the same code and data
as the spawning isolate.
Web workers don’t have an equivalent API.